Drawing Tips - Blog Posts


tutorial for drawing characters with cleft lip! sorry that it's mostly unilateral-centric but it makes up the vast majority of resources and photos. still tried to get tips for drawing bilateral clefts in though.
please keep in mind that this is an introductory drawing tutorial and has some generalizations in it, so not every “X is Z” statement will be true for Actual People : )
if you draw any characters using this feel free to tag me!!
This feels ~downy ~, how lovely that would be.


Wing Tutorial is HERE 🦅, now available on my Patreon✨ It includes full speedpaints, a step-by-step of the painting process, drawing tips + more!
I forgot I have to be active here so here’s my Twitter tutorial on how to draw folds I made a while back to help a friend!


I just had some...thoughts... about sticking animal heads on human shoulders. Bear with me.
I think the reason some anthros look really strange (I’m looking at you, Skyrim) is because animal skulls don’t attach to their spines the same way ours do. Our spines and skulls are very vertical, but many animals’ are closer to horizontal.

Some people solve this by giving the animal skulls a human skull shape on the back. But, to me it makes them look somehow bald(??) and just kinda weird in general. If, instead, you change their necks to curve so that the spine still connects where their four legged counterparts’ do, they no longer look yucky! (And also don’t need a hair-do!)

This seems especially applicable for animals like big cats, cows, and lizards — animals whose spines attach very horizontally to their heads.

Anyway, enjoy some more art I did while having these very specific thoughts.


God I need this. I am a perfectionist and I hate everything I make. Just need to remember this and all should be well.
how do draw good
fill 14 sketch book
bad stuff is good stuff bc you made stuff
do you like sparkle???? draw sparkle
draw what make your heart do the smiley emote
member to drink lotsa agua or else bad time
d ont stress friend all is well
your art is hot like potato crisps
don’t let anyone piss on your good mood amigo
if they do
eat
them
How do I art?
This is a difficult question and I'm gonna give a basic bitch answer, but practice.
-Try to draw a little bit every day (if you can't, at least a couple times a week)
Don't go for realism right off the bat. You're not going to be able to draw a perfect human face or anything when you first start
Draw cartoons. For you, I'd recommend Owl House, Amphibia, Gravity Falls, or Hazbin Hotel/Helluva Boss characters. That way you can get used to drawing without it being to challenging
VERY light sketches. You're going to want to brush the pencil across your paper in a feathery motion. Pushing too hard is very difficult to erase
Don't use a mechanical pencil eraser. A mechanical pencil is fine, but the eraser tends to smear and smudge instead of just erasing (a pink eraser's perfect)
Use a reference picture. Drawing from your mind is a lot harder than drawing from a pic. You also don't have to be creative in order to draw
(this one's really cringe but) Don't give up or throw your art away. Your art's gonna be bad at first, but if you give up, you'll never get better
Some people think that to draw well you need to have good and expensive materials, but I only use a mechanical pencil and a regular school eraser, and I rarely use the markers I have.
An example drawing:

Here I just used a mechanical pencil, an eraser and my finger to make it a little smudged. In other words, to draw well, you need: good motor coordination and practice.
Drawing bonus with markers:

You draw hats so well and im like so amazed by it because every time i try it looks like they're wearing buckets?? how do you draw them?? :o


pringles
Ink Blobs! Which one of these blob sketches is your favorite? ☺️💕


More art tutorials by Disney artists Griz and Norm Lemay


Someone wanted some facial advice, so I just collect some tips. Free to ask for more advice.
I forgot I have to be active here so here’s my Twitter tutorial on how to draw folds I made a while back to help a friend!


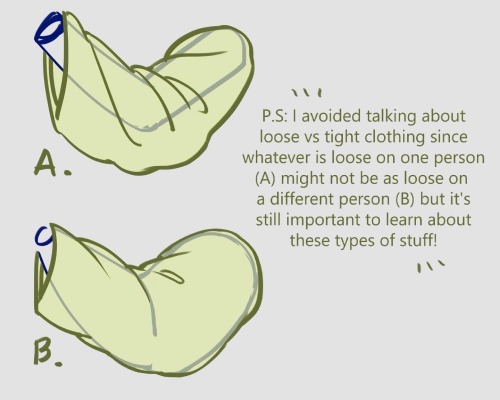
“Notes on skirts and pants”
Source: miyuli on twitter
I just know that out there, somewhere, are artists that have pinterest boards and youtube playlists of art tips and tutorials they’ll never view/use.
A general cane guide for writers and artists (from a cane user, writer, and artist!)
Disclaimer: Though I have been using a cane for 6 years, I am not a doctor, nor am I by any means an expert. This guide is true to my experience, but there are as many ways to use a cane as there are cane users!
This guide will not include: White canes for blindness, crutches, walkers, or wheelchairs as I have no personal experience with these.
This is meant to be a general guide to get you started and avoid some common mishaps/misconceptions, but you absolutely should continue to do your own research outside of this guide!
![[Image text] Arm bends a little. Cane height at hip joint. Many canes have adjustable height. Cane sits within the natural center of balance. Causes stress on: Triceps, upper back, wrist (pressure) fingers (grip). Helps with: Joints (lower back, hip, knee, ankle, foot), weakness, balance, pain.](https://64.media.tumblr.com/0c8731401f496885dc8d4309a7dbe7ee/f831b3159e1d7635-e7/s500x750/6e5fe00081a6ce3b64cbe1a648f0c967f9f601e9.jpg)
The biggest recurring problem I've seen is using the cane on the wrong side. The cane goes on the opposite side of the pain! If your character has even-sided pain or needs it for balance/weakness, then use the cane in the non-dominant hand to keep the dominant hand free. Some cane users also switch sides to give their arm a rest!
A cane takes about 20% of your weight off the opposite leg. It should fit within your natural gait and become something of an extension of your body. If you need more weight off than 20%, then crutches, a walker, or a wheelchair is needed.
Putting more pressure on the cane, using it on the wrong side, or having it at the wrong height will make it less effective, and can cause long term damage to your body from improper pressure and posture. (Hugh Laurie genuinely hurt his body from years of using a cane wrong on House!)
(an animated GIF of a cane matching the natural walking gait. It turns red when pressure is placed on it.)
When going up and down stairs, there is an ideal standard: You want to use the handrail and the cane at the same time, or prioritize the handrail if it's only on one side. When going up stairs you lead with your good leg and follow with the cane and hurt leg together. When going down stairs you lead with the cane, then the good leg, and THEN the leg that needs help.
Realistically though, many people don't move out of the way for cane users to access the railing, many stairs don't have railings, and many are wet, rusty, or generally not ideal to grip.
In these cases, if you have a friend nearby, holding on to them is a good idea. Or, take it one step at a time carefully if you're alone.
Now we come to a very common mistake I see... Using fashion canes for medical use!
![[Image text] 4 Major Handle Shapes (significant variation and uses). Tourist/Crook/Hook. Classic shape, fashion and medical, easy to hook on things (arm, door, chair, etc), generally solid wood (stronger, heavier). Offset. Newer design, not a fashion handle, only handle for quad-bases, generally better balance, usually aluminum (light + cheap), soft handle, adjustable (rattles/clicks when swinging). Derby/Fritz/Anatomical/Contour. Classic medical shape, many fashion variants, some fashion + medical, varies in many ways, sometimes contoured to hand, comes in foldable styles, many aluminum styles, many customizable styles. Knob/Decorative. Fashion exclusive, knob shape hurts the hand after prolonged pressure (especially with designs), tend to be heavy, "sword canes" have the same issues.](https://64.media.tumblr.com/102d2e5f13a88817eaa44974bc5a7486/f831b3159e1d7635-e2/s500x750/887023dbcfc758db12a7fcf3f258bca52eba2d53.jpg)
(These are 4 broad shapes, but there is INCREDIBLE variation in cane handles. Research heavily what will be best for your character's specific needs!)
The handle is the contact point for all the weight you're putting on your cane, and that pressure is being put onto your hand, wrist, and shoulder. So the shape is very important for long term use!
Knob handles (and very decorative handles) are not used for medical use for this reason. It adds extra stress to the body and can damage your hand to put constant pressure onto these painful shapes.
The weight of a cane is also incredibly important, as a heavier cane will cause wear on your body much faster. When you're using it all day, it gets heavy fast! If your character struggles with weakness, then they won't want a heavy cane if they can help it!
This is also part of why sword canes aren't usually very viable for medical use (along with them usually being knob handles) is that swords are extra weight!
However, a small knife or perhaps a retractable blade hidden within the base might be viable even for weak characters.
![[Image text] 4 Major base shapes (significant variation and uses). Adjustable base. Aluminum, standard modern medical, adjustable height, rubber base, wears down over time. Tripod/ quad base. If you need extra balance. Terrain attachment (varies, this is for ice). Removable, helps stop slipping on ice/snow/sand/etc, some canes have a retractable tip for ice. Classic base. Non-adjustable, custom only, modern standard still has a rubber base.](https://64.media.tumblr.com/78d350cfac4077376b7ce521a9a7d929/f831b3159e1d7635-ab/s500x750/4b4a6b8062c06686baf17c83c28b793bfb89e05b.jpg)
Bases have a lot of variability as well, and the modern standard is generally adjustable bases. Adjustable canes are very handy if your character regularly changes shoe height, for instance (gotta keep the height at your hip!)
Canes help on most terrain with their standard base and structure. But for some terrain, you might want a different base, or to forego the cane entirely! This article covers it pretty well.
Many cane users decorate their canes! Stickers are incredibly common, and painting canes is relatively common as well! You'll also see people replacing the standard wrist strap with a personalized one, or even adding a small charm to the ring the strap connects to. (nothing too large, or it gets annoying as the cane is swinging around everywhere)
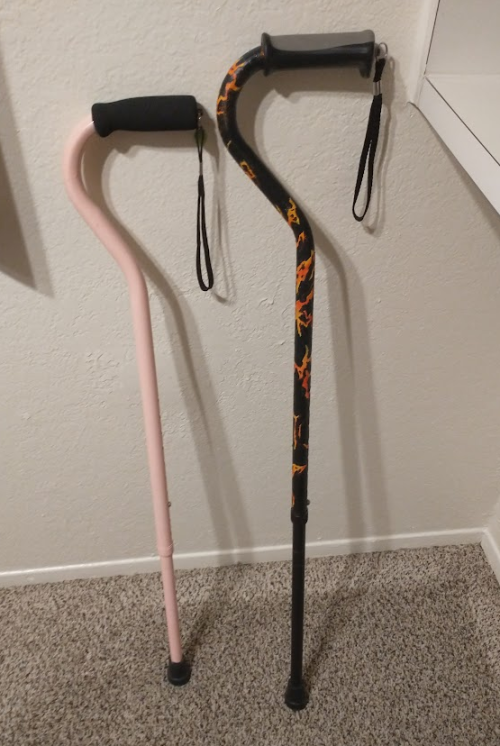
(my canes, for reference)
If your character uses a cane full time, then they might also have multiple canes that look different aesthetically to match their outfits!
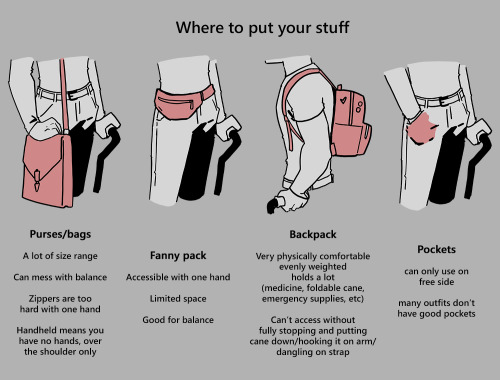
When it comes to practical things outside of the cane, you reasonably only have one hand available while it's being used. Many people will hook their cane onto their arm or let it dangle on the strap (if they have one) while using their cane arm, but it's often significantly less convenient than 2 hands. But, if you need 2 hands, then it's either setting the cane down or letting it hang!
For this reason, optimizing one handed use is ideal! Keeping bags/items on the side of your free hand helps keep your items accessible.
When sitting, the cane either leans against a wall or table, goes under the chair, or hooks onto the back of the chair. (It often falls when hanging off of a chair, in my experience)
When getting up, the user will either use their cane to help them balance/support as they stand, or get up and then grab their cane. This depends on what it's being used for (balance vs pain when walking, for instance!)
That's everything I can think of for now. Thank you for reading my long-but-absolutely-not-comprehensive list of things to keep in mind when writing or drawing a cane user!
Happy disability pride month! Go forth and make more characters use canes!!!
Art Tutorials!
Greetings! Meanwhile, I wanted to thank you for all the support you're giving us here on Tumblr, really means a lot! ❤️
I would like to start using this blog not only to show our works but also as a personal diary of our artistic journey... so let us know if you are interested in any particular content!
So... why not start with some artistic tutorials? :P
CHAPTER ONE:
an artistic mind makes an artistic guy.
Before throwing ourselves in a deep technical vision and some kind of “how to” things, I find truly important to talk about attitude and mental arrangement, because a thing like knowing how to unlock when you are not inspired, are as significant as know which tool to pick. Or maybe more important, really.

1) PRACTICE
The first thing that we need to say is that, like everything, to obtain results, you need practice, time and passion. Everyone can draw decently, just need some practice and time. Natural talent doesn't really exist at all, of course for some people, truly passionate on what they’re doing, should need less time that other, but believe me, with constancy and dedication, you can do everything.

2) SELF CRITIQUE
Second thing you need to know is to be a self-critique, it’s really important to understand errors, and learns from it. That’s the fast way to learn something. Neither an instructor can gift a teaching better than that, because when we fail of course we feel bad, but for sure we will learn how to avoid this next time.

3) RESEARCH
Third fact is: when you feel stuck, don’t give up. Just take a breath, think about what you don’t like in your art, and then try to solve it. Example, you’re drawing a face. However, it looks horrible to you. Well, try to answer that question: why I don’t like this? The eyes are too small? His nose is awry? Look too flat? Well, then try to improve the parts you dislike. You don’t like that at all? Take a break then, some minutes, an hour, a day, rest on your eyes really help a lot. Maybe on your first attempts you don’t make some masterpiece, but is important to rejoice of small success and remember that a bad drawing will never, listen to me, never, be a failure, because from it, you will learn a lot, and believe me if I say that you became better after that.

4) FIND INSPIRATION
At the fourth position, we’re talking about finding inspiration. Inspiration it’s not something like a mana bar that needs to charge, of course on some day we really don't' want to do anything, but you don’t need a divine touch to make some art. So, my best advice is to look around, look at your drawing from distance, see the world around you, just make some steps in your room or go into the courtyard to take a break, or maybe search some image on the web. Take a look on the real life, to find some references to put and transform it in a piece of art. And well, let’s talk about references. If you're attempting to make a realistic drawing is essential to use a model, a photo to study how the light build the shape, how the texture looks and the proportion are connected with different part, but even if you make a cartoon character you need to take elements from real life. Even on an abstract painting you may find useful to put some elements in it, because from reality human use to find a correspondence, an identity, and it’s what can give to your art a personality. So to make art it’s very important to learn to observe. Don't just watch at something, observe, trying to understand every part in a thing. Sometimes to make a good painting is all about details, and the best way to know how to do is to synthesize what our eyes are teaching to us.
5) (extra tip) ENJOY!
Art doesn't have to be a frustrating activity, it doesn't have to make you feel inferior to others or even better than others. It must be a way to express yourself, both with pleasurable and sad emotions, must make you feel free to communicate and not to feel yourself closed in a corner of your room. You have to relax, make you smile, but don't make you suffer, make you cry and make you angry. Certainly the creative process is not always fluid, but if you really like what you are doing, then everything else will not matter. Besides, art has a therapeutic power, and it can really help in difficult times. The art is our friend, who listens to us, and likes us. Not our rival that makes us angry, hurts us and makes you hate everything else. So always remember to have fun, first of all :)
I know, that may looks boring and useless for some of you, maybe you need to know how to make a perfect color blending or to make a realistic eye just with a pair of strokes, but attitude is the most important part of everything in the life. Learn from your error, never give up, and I’m sure you’ll create a lot of a masterpiece.
See you next time, talking about tools and everything you need to be an artist!
⭐️ Part 2 here => https://moonpix-art.tumblr.com/post/173191380078/art-tutorial-chapter-2 ✨
For reference 🩷


Overview of some topics when it comes to drawing characters who are burn survivors.
DISCLAIMER. Please keep in mind that this is an introductory overview for drawing some burn scars and has a lot of generalizations in it, so not every “X is Z” statement will be true for Actual People. I'm calling this introductory because I hope to get people to actually do their own research before drawing disabled & visibly different characters rather than just making stuff up. Think of it as a starting point and take it with a grain of salt (especially if you have a very different art style from mine).
Talking about research and learning... don't make your burn survivor characters evil. Burn survivors are normal people and don't deserve to be constantly portrayed in such a way.

edit: apparently tum "queerest place on the internet" blr hates disabled people so much that this post got automatically filtered. cool!
second way more important edit: How are people seeing this post where I specifically talk about burn survivors being normal, real people, and still tag this as "TW body horror"? Not a single one of these drawings or pictures is a fresh injury. All of them are healed. How the hell would you feel if someone tagged a photo of you as "trigger warning: gore"?
Disabled people are not your fucking body horror. Grow up.


You asked and I delivered!
EDIT: Forgot to mention - if you’re drawing in color with lighting, the lighting will be different depending on fabric, so look it up if you want (or do whatever you want to be honest, who the hell cares, it’s not a competition. I don’t even follow this rule, I’m saying as a fact XD)
How it feels to have the motivation and the time to write/ draw but not the talent.

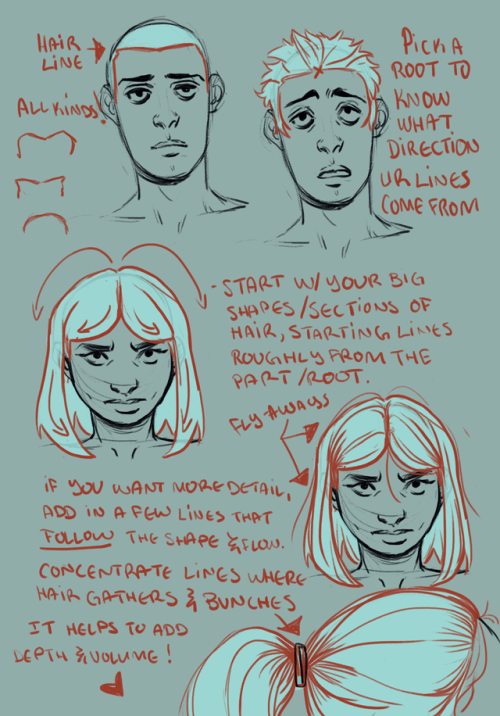
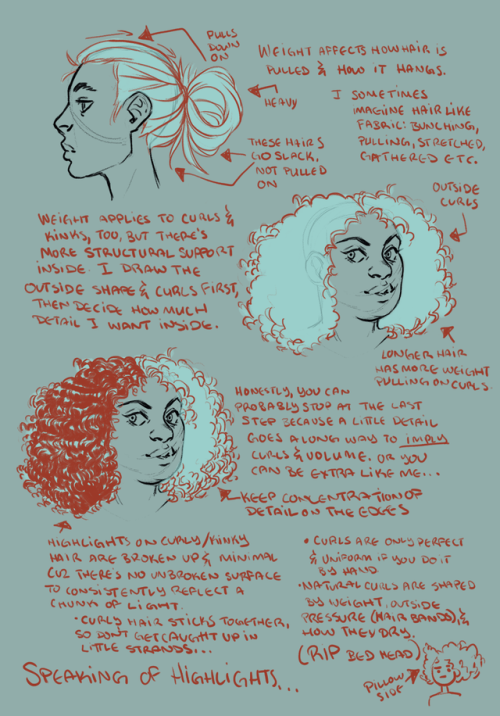
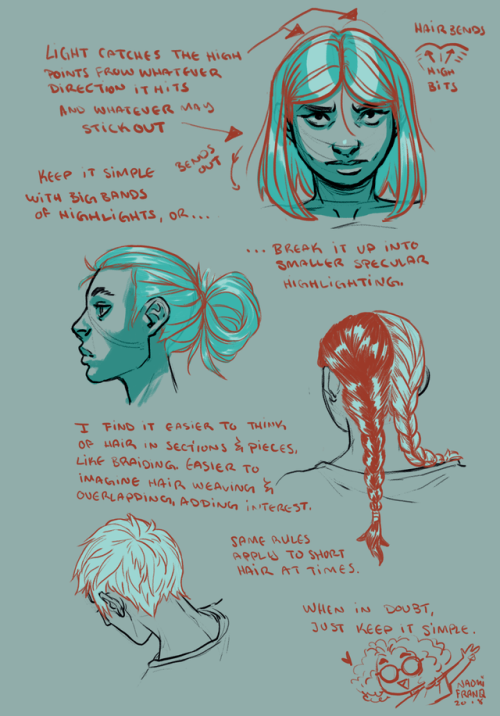
I jotted down for a friend of mine some tips and notes on how I approach drawing hair, and things I keep in mind while doing so, and thought I’d share. There are loads of other ways to do it, and the learning never stops, so I hope this helps!


people have asked me how i draw eyes so i made an extremely slap-dash eye tutorial! this is simply about how i draw a simple neutral eye, nothing to do with expressions (that’s a whole other thing).
start with the horizontal guide on the face, to help place the eyes. put circles where the eyes will go!
adjust the circles into diamond shapes– i got this idea from sinix design on youtube, it’s very helpful and easier to see where the lids should end than with a circle.
draw the top lid/lash lines, leaving a bit of space at the top of the diamond. keep each eye in time with each other– drawing one whole eye first makes it harder to match the other one.
then the bottom lids. i usually try to do all the lid shapes with a single curved stroke each. keep it simple pals!
irises & pupils. sometimes i’ll draw filled-in black circles for the irises, to help figure out where to place them naturally!
lid creases, use the leftover diamond at the top as a loose guide for where to place them. remember that the lid curves around the eyeball.
make adjustments! things don’t always come out perfect immediately. i usually have to thicken the lash line (i like mine quite thick), move the bottom lid up or down, and sometimes resize a whole eye (easier on computer than traditional, i know!). if you’re on a computer make sure to flip your canvas often so you can see these little things ❤
and to practice, just doodle a lot of small eyes! keeping them small makes them easier and faster to finish, so you can focus on your strokes and playing around with shapes, tilt, lid space, all that. don’t worry about making the irises perfect circles/ovals or any of that, just try to capture the character. have fun!


Blue’s Feathers and Wings Compendium: Atypical Wing Shapes
Part 1 [Standard ]| Part 2 [Atypical] | Feather Markings | Tail Feathers
A compendium of different feather marking types that can be used for inspiration in writing and art; especially if you want to be explicitly clear on the markings and don’t want to just have “striped” or “spotted”.
Disclaimer: I am aware that some of these markings have different names when coming from different birds, and that some of these markings are more artistic than realistic, but this for the fun and benefit of others, not for science.

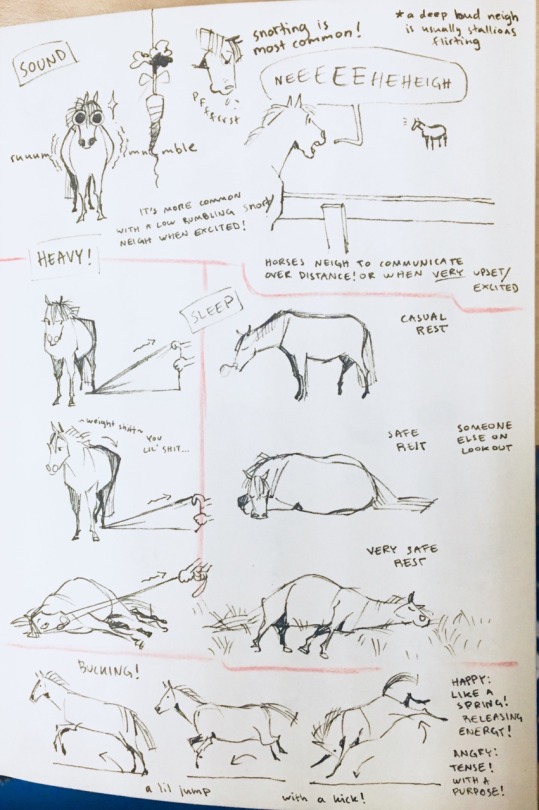


Todays doodles are Myras personal Horse Acting Guide! 🐴
DISCLAIMER: im not a horse expert, but i’ve been hobby riding for 13 years and read some books through the years, so it’s just my personal experience. I dont know everything and people have different ways!
Please read! Needing some advice
I have always struggled to draw backgrounds… if anyone has some good advice on drawing forests,caves, and other wildlife backgrounds it would be greatly appreciated! Please share your artistic wisdom in the comments or reblogs!

Reasons
I’m currently working on a webcomic and a lot of the backgrounds I end up creating end I’m being…too soft or too “blendy”. Not only does this style look ashy and lazy but it also doesn’t fit in with the style I draw my characters. My characters are usually pretty toony and what looks best on them ( in my opion ) is sharp anime like lighting and shadows. I tried useing more softer light on my characters but it’s just not my thing ( I could also be just bad at lighting and shading ). So if anyone has advice on drawing more sharper backgrounds it would be so graciously appreciated!
Thank you!!! 💛💚🧡
